Since I am kind of stuck on testing for my library, I decide to move to another direction of my project. I need to use my library to rebuild the visualization that I created last semester(Monitor, GeoMap, Stoplight), so that I can compare the code to tell if my library really help the WattDepot web application development. The Stoplight and Monitor are pretty easy to implemented (just retrieve the data and display). You may visit the project hosting page and check it out. The GeoMap visualization is little bit harder, because it contains some nested requests and data manipulation, also because it was using Google Map API version 2 and I need to migrate my code to adapt version 3 now. In this blog post, I will discuss about some changes that I dealt with when upgrading my code with Google Map API V3.
1. Map Object
The most fundamental object in Google Map API is the map object. In V3, MapTypeId is added as the required property to render the map. This property tells the map type is either "RoadMap", "Satellite", or something else. Another thing new in V3 is the way it calculates the zoom level by the bound. In V2, you need to call getBoundsZoomLevel(bound) to get the zoom level and set the map with the zoom level it returned. In V3, you simply need to call fitBounds(bound) and the whole thing is done.
2. Marker Object
In V2, marker object is a subclass of overlay. Once you created a marker, you need to call map.addOverLay(marker) to add marker to the map. In V3, the marker object has a map property. If this property is set, the marker will be added to the map stored in this property. Another minor change is that in V3, it uses markerImage object to replace the icon object in V2.
3. Infowindow Object
In V3, Google Map API introduce the infowindow object. Infowidnow object is basically the dialog box that usually comes up when a marker is clicked. In V2, only one dialog box can be showed in the map at one time and In V3 multiple dialog box can be showed simultaneously. In V2, this effect is invoked by openInfoWindowHtml() function inside an overlay object. You simply pass the html code showing in the dialog box as the parameter to the openInfoWindowHtml() function. In V3, infowindow object has a content property, which manages the content of the dialog box, and it also has a size property, which controls the size of the dialog box. (Note: dialog box size can only be set in size property. In V2, it can be set inside the content.)
By far, these are the changes that affacts my code the most. Upgrading the code to adapt a new version of a library always involves a lot of learning, debugging, and coding. This is exactly how I upgrade my code to use Google Map API V3. First, I found some sample code that using the Google Map API V3 and had a general idea of how much the api was changed. Then I went back to my code and checked which functions are replaced or gone. Last, I used the new way to rewrite the code for those broken functions and debug the program. Hopefully my experience can help some one who just start migrating his/her code to a new version of Google Map API.
Tuesday, December 21, 2010
Friday, December 17, 2010
Jsunit Try Out
After the basic functionality of my library is implemented, it is the time to add some quality assurance to the project. One of the most important quality assurance methods is unit testing.
However, I was kind of lost because I don't have any unit testing experience in JavaScript web application. At this point, my graduate adviser Dr. Johnson introduced Jsunit to me provided several links to help me get start on it. In this blogpost, I will discuss about something I learned about Jsunit.
Get Jsunit Running:
Jsunit is an open source software for JavaScript unit testing. It is very easy to download. You may simply go to the download page in Source Forge. Inside the Jsunit package, there is a file called "testRunner.html", which is the unit testing user interface. In testRunner page, I can input the path of my testing file in "File" field and click "Run" to run the unit test.
The test result would look like this:
 Create a Unit Test:
Writing a unit test in JavaScript is nothing different from writing it in other languages. The only thing need to mention is that, in order to run Jsunit for unit testing, you must include the "JsUnitCore.js" in your test file. (Inside "app" folder) This is the place that contains all the Assert functions.
Problems in Jsunit:
After some experiment in Jsunit, I found some difficulties that I cannot get over with.
1. Test file must locate inside the Jsunit folder or its sub folders, otherwise in testRunner.html, your test file cannot be loaded to the Jsunit. For example, I put my test file in the same level as the Jsunit folder. Then I changed the script tag to:
2. Jsunit cannot test the AJAX response and its callback. Since my library is heavily related with AJAX, I need to test if my AJAX request will get the correct response. However, in Jsunit, I didn't find a way to test it. I think it is because Jsunit runs the test suite asynchronously, so it cannot wait for the AJAX response. I did some research online about the callbacks testing. Some people suggest using the clock object in "jsUnitMockTimeout.js" to simulate the state of after some time(say 10 secs). I tried it, it only works for the "system.timeout()" thing but not for the AJAX response.
Anyway, I realize that Jsunit is not supported by its developer any more, so I guess I need more research on how to overcome these problems. In all, my opinion is that Jsunit is an acceptable tool for unit testing. I certainly hope I can find another tool to replace it.
However, I was kind of lost because I don't have any unit testing experience in JavaScript web application. At this point, my graduate adviser Dr. Johnson introduced Jsunit to me provided several links to help me get start on it. In this blogpost, I will discuss about something I learned about Jsunit.
Get Jsunit Running:
Jsunit is an open source software for JavaScript unit testing. It is very easy to download. You may simply go to the download page in Source Forge. Inside the Jsunit package, there is a file called "testRunner.html", which is the unit testing user interface. In testRunner page, I can input the path of my testing file in "File" field and click "Run" to run the unit test.
The test result would look like this:
 Create a Unit Test:
Writing a unit test in JavaScript is nothing different from writing it in other languages. The only thing need to mention is that, in order to run Jsunit for unit testing, you must include the "JsUnitCore.js" in your test file. (Inside "app" folder) This is the place that contains all the Assert functions.
Problems in Jsunit:
After some experiment in Jsunit, I found some difficulties that I cannot get over with.
1. Test file must locate inside the Jsunit folder or its sub folders, otherwise in testRunner.html, your test file cannot be loaded to the Jsunit. For example, I put my test file in the same level as the Jsunit folder. Then I changed the script tag to:
<script type="text/javascript" src="jsUnit/app/jsUnitCore.js"></script>
2. Jsunit cannot test the AJAX response and its callback. Since my library is heavily related with AJAX, I need to test if my AJAX request will get the correct response. However, in Jsunit, I didn't find a way to test it. I think it is because Jsunit runs the test suite asynchronously, so it cannot wait for the AJAX response. I did some research online about the callbacks testing. Some people suggest using the clock object in "jsUnitMockTimeout.js" to simulate the state of after some time(say 10 secs). I tried it, it only works for the "system.timeout()" thing but not for the AJAX response.
Anyway, I realize that Jsunit is not supported by its developer any more, so I guess I need more research on how to overcome these problems. In all, my opinion is that Jsunit is an acceptable tool for unit testing. I certainly hope I can find another tool to replace it.
Tuesday, December 14, 2010
Something about converting XML to JSON
For the past few weeks, I have worked on several tasks and in the following several blog posts I would like to talk about what I have learned. This time, I am going to talk about something tricky I found in converting XML to JSON.
Actually, there is no universal standard in converting XML to JSON. Every one may have his/her own standard while converting. Here, I will explain the mechanism I used in my conversion function first.
Basic Concept:
Basically, convert Xml to JSON is to parse Xml and translate each node into a JSON object, then nest the JSON objects according to the Xml structure. The most common way to parse Xml is using a recursive function, so that it can recursively go through each node level. For each recursive cycle, the parser normally needs to handle three situations:
Use the following simple xml as an example:
Only element can have attributes. So the function needs to loop through and save all the attributes before it goes further.
2. Elements with child nodes (nodeType = 1). In this case, "book"(it has a child node which contains the Text of "Lord of the Ring". So create an object with the node name and start parsing all its child nodes.
3. Text of an element (nodeType = 3).
In this case, "Lord of the Ring". So simply return the node value.
A little problem came up:
I followed these rules and my function appears working well. However, when I used it to parse a self-closed Xml element, it failed. For example: Parsing following xml,
After some investigation, I found some thing very interesting. It looks like self-closed Xml element will have a leading empty Text node before the element node, which means the parser will get a Text node with a value of " " before the Element node with a value of "book". Since the parser will not continue parsing if the input is a Text node, it will not be able to parse the element node. Therefore, I need to add an condition statement to take care of this situation.
In the end, I posted the xmlToJson conversion function I built. Hopefully, it will help some developers that working on this subject.
Actually, there is no universal standard in converting XML to JSON. Every one may have his/her own standard while converting. Here, I will explain the mechanism I used in my conversion function first.
Basic Concept:
Basically, convert Xml to JSON is to parse Xml and translate each node into a JSON object, then nest the JSON objects according to the Xml structure. The most common way to parse Xml is using a recursive function, so that it can recursively go through each node level. For each recursive cycle, the parser normally needs to handle three situations:
Use the following simple xml as an example:
<book state="new">Lord of the Ring</book>Only element can have attributes. So the function needs to loop through and save all the attributes before it goes further.
2. Elements with child nodes (nodeType = 1). In this case, "book"(it has a child node which contains the Text of "Lord of the Ring". So create an object with the node name and start parsing all its child nodes.
3. Text of an element (nodeType = 3).
In this case, "Lord of the Ring". So simply return the node value.
A little problem came up:
I followed these rules and my function appears working well. However, when I used it to parse a self-closed Xml element, it failed. For example: Parsing following xml,
Interesting discovery:<bookstate="new" title="Lord of the Ring" />
After some investigation, I found some thing very interesting. It looks like self-closed Xml element will have a leading empty Text node before the element node, which means the parser will get a Text node with a value of " " before the Element node with a value of "book". Since the parser will not continue parsing if the input is a Text node, it will not be able to parse the element node. Therefore, I need to add an condition statement to take care of this situation.
In the end, I posted the xmlToJson conversion function I built. Hopefully, it will help some developers that working on this subject.
 function xmlToJson(xml) {
  var obj = {};
  // element
  if (xml.nodeType == 1) {
    // check attributes
    if (xml.attributes.length > 0) {
      for (var j = 0; j < xml.attributes.length; j++) {
        obj[xml.attributes[j].nodeName] = xml.attributes[j].nodeValue;
      }
    }
  }
  // check child node
  if (xml.hasChildNodes()) {
    for(var i = 0; i < xml.childNodes.length; i++) {
    // check if the child node has another child node, if not,
    // this child node is the text value of the parent node.
      if (xml.childNodes[i].nodeType != 3 || i != xml.childNodes.length - 1) {
        //check if this node name is existed in obj, if not, add
        //this node as a property to current obj
        if (typeof(obj[xml.childNodes[i].nodeName]) == 'undefined') {
          obj[xml.childNodes[i].nodeName] = xmlToJson(xml.childNodes[i]);
        }
        else {
        //check if there is the array for this node name, if not, create
        //an array and add the existing one to the array
          if (!(obj[xml.childNodes[i].nodeName] instanceof Array)) {
            var old = obj[xml.childNodes[i].nodeName];
            obj[xml.childNodes[i].nodeName] = [];
            obj[xml.childNodes[i].nodeName].push(old);
          }
          obj[xml.childNodes[i].nodeName].push(xmlToJson(xml.childNodes[i]));
        }
      }
      else {
        //if it is a text node, just return the value. No object created
        //for text node.
        return xml.childNodes[i].nodeValue;
      }
    }
  }
  else {
    //if it is a self closed element, it will have a blank text node before parser
    //reach the element. Ignore it.
    if (xml.nodeType == 3) {
      return xml.nodeValue;
    }
  }
  //return this object
  return obj;
}
Tuesday, October 19, 2010
WattDepot Data Miner 1.0.1
Finally, this week I have finished the first version of the WattDepot Data Retrieval Library, which I called WattDepot DataMiner. I have also created a Google project hosting for WattDepot DataMiner. In this blog post, I will brief explain what feature this library has and direction of future development.
As I mentioned in previous blog post, WattDepot DataMiner is designed to facilitate developers in data retrieval tasks related with a WattDepot server. Therefore, first of all, it has three functions that take care of the Ajax calls:
1. a function to take care of the creation of a xmlHttpRequest object.
2. a function that sets all the important parameters of an Ajax call.
3. a function send the xmlHttpRequest and handle the response.
Since the data retrieved from the WattDepot server are Xml files, it is necessary to convert them into a more JavaScript oriented format, such as JSON, so that developers can easily manipulate the retrieved data. Therefore, WattDepot DataMiner has a convert function that convert the raw data to a JSON object.
Even though the retrieved data are represented in a JSON object, the internal structure is still the same as in the xml file. Since most people, who are new to WattDepot, probably are not familiar with the xml structure, it is hard for them to find the desiring field in the response. To help those people, there is a function that loop through a JSON object and return the node with a specific name.
Further more, WattDepot-DataMiner has three data-retrieval functions: getAllSources(), getSourceSensorData(), getSourceLatestSensorData(). These functions are some typical data-retrieval functions from all the data-retrieval functions. They used for test the functionality of other functions for now.
Future development that I planed:
1. Keep adding some more data-retrieval functions to the library, so that WattDepot DataMiner can handle more data retrieval tasks.
2. Use WattDepot DataMiner to rebuild some existing visualizations, so that I can find out what else feature I need to add to the library.
Tuesday, October 12, 2010
Understanding JavaScript Closures
This week, when I was studying other JavaScript libraries (prototype, JQuery), I noticed that closure is frequently used in the code. Then I decided to do some research on JavaScript closures. In this blog post, I would like to share something I learned about JavaScript closures.
1. What is JavaScript closure?
There are plenty definitions for JavaScript closure. It seems that every one has his own understanding towards it. In my understanding, closure is an internal reference that keeps the value of all the local variables that used inside a function even if the function has returned. It is intangible and always existing when a function is called within another function. Therefore, the key feature for JavaScript closure is that it keeps the value of the local variables within a certain scope(For example, a function).
Then you might say, an object can keeps the value of the variables well. What is the difference? The difference is that the variable in object can be accessed from outside where the variable in closure is not accessible from outside. For example:
2. When use JavaScript closure?
Since JavaScript closure keeps the local variables alive in a function, it is very useful for those functions that are called asynchronously. For example, AJAX callbacks, which I definitely going to use in my library, they only get called when they receive the response from the server. Another example is event handler, it is called only when certain event is triggered. The simplest example shows the power of closure would be setTimeOut function. Here is the traditional way without closure:
3. Be careful with JavaScript closure
Since other programming languages, such as C or Java, do not have any feature like JavaScript closure, new JavaScript developers are not familiar with this concept. Therefore, extra caution is really necessary when using closure in the code. One common bug producer is defining function within a loop. Let's focus on the following example:
This example shows that we must fully understand closure and use it correctly, otherwise, weird bugs might raise.
1. What is JavaScript closure?
There are plenty definitions for JavaScript closure. It seems that every one has his own understanding towards it. In my understanding, closure is an internal reference that keeps the value of all the local variables that used inside a function even if the function has returned. It is intangible and always existing when a function is called within another function. Therefore, the key feature for JavaScript closure is that it keeps the value of the local variables within a certain scope(For example, a function).
Then you might say, an object can keeps the value of the variables well. What is the difference? The difference is that the variable in object can be accessed from outside where the variable in closure is not accessible from outside. For example:
function Person(name) {
  this.message = name + " says hi!";
};
Person.prototype.greet = function greet() {
  alert(this.message);
};

var Yichi = new Person('Yichi');
Yichi.greet();
function Person(name) {
  var message = name + " says hi!";
  function greet() {
    alert(message);
  }
  return greet;
};

var Yichi = Person('Yichi')();
2. When use JavaScript closure?
Since JavaScript closure keeps the local variables alive in a function, it is very useful for those functions that are called asynchronously. For example, AJAX callbacks, which I definitely going to use in my library, they only get called when they receive the response from the server. Another example is event handler, it is called only when certain event is triggered. The simplest example shows the power of closure would be setTimeOut function. Here is the traditional way without closure:
function handle() {
  alert(message);
}

function setAlarm(message, timeout) {
  setTimeout(handle, timeout);
}

setAlarm("Hello World!", 100);
function setAlarm(message, timeout) {
  function handle() {
    alert(message);
  }
  setTimeout(handle, timeout);
}

setAlarm("Hello World!", 100);
3. Be careful with JavaScript closure
Since other programming languages, such as C or Java, do not have any feature like JavaScript closure, new JavaScript developers are not familiar with this concept. Therefore, extra caution is really necessary when using closure in the code. One common bug producer is defining function within a loop. Let's focus on the following example:
function main(link) {
  for (var i = 0; i < list.length; i++) {
    link[i].onClick = function() {
      alert(i + 1);
    }
  }
}

main(document.getElementsByTagName("a"));
function main(link) {
  for (var i = 0; i < list.length; i++) {
    link[i].onClick = (function(j) {
      return function() {alert(j + 1);}
    })(i);
  }
}

main(document.getElementsByTagName("a"));
This example shows that we must fully understand closure and use it correctly, otherwise, weird bugs might raise.
Tuesday, October 5, 2010
Data Communication in JSON
This week, I did some research on JSON, which I am going to use in my JavaScript Library for data representation. Here, I am going to talk about JSON in three aspects:
1. What is JSON?
JSON (JavaScript Object Notation) is a light weight data interchange format alternative to using XML. From its definition we can tell one important thing: JSON is a JavaScript Object. It is formed by numbers of key value pairs. Since the value can be any data type, developer can store other arrays or other objects, nesting them as deeply as needed.
An example of JSON would look like:
An example of XML would look like:
2. Why use JSON? (compare with XML)
As you might notice, JSON does not have tons of open and close tags or long list of attributes. It is more structured and more human readable than XML. Not only the size of data file is smaller, JSON is also easier to use in programing! Let's use the above data file as an example. Let's say I need to find the value of "name". If the data is in XML format, the code would look like:
So, JSON is more JavaScript-Oriented than XML.
3. How to generate JSON?
Since WattDepot is going to provide data in XML format and I am not able to make any change on the server side, I need to find a way to convert XML data to JSON. Actually, there are some existing libraries out there for converting XML to JSON. One of them is Google Data API. In Google.Data.JSON package, it contains a xml_to_json($xml) method that can convert a XML file to JSON format. Here is a reference. In this case, I can simply use Google Data API in my library to handle the conversion.
Hopefully, my blog can help those JSON beginners like me:)
1. What is JSON?
JSON (JavaScript Object Notation) is a light weight data interchange format alternative to using XML. From its definition we can tell one important thing: JSON is a JavaScript Object. It is formed by numbers of key value pairs. Since the value can be any data type, developer can store other arrays or other objects, nesting them as deeply as needed.
An example of JSON would look like:
{
  name : "Yichi",
  major : "Computer Science",
  hobbies : [
    "Travel","Video Game"
  ]
}
An example of XML would look like:
  <name>"Yichi"</name>
  <major>"Computer Science"</major>
  <hobbies>"Travel"</hobbies>
  <hobbies>"Video Game"</hobbies>
2. Why use JSON? (compare with XML)
As you might notice, JSON does not have tons of open and close tags or long list of attributes. It is more structured and more human readable than XML. Not only the size of data file is smaller, JSON is also easier to use in programing! Let's use the above data file as an example. Let's say I need to find the value of "name". If the data is in XML format, the code would look like:
var temp = xmldoc.getElementsByTagName('Name')[0].childNodes[0].nodeValue;
var temp = jsondoc.name;
So, JSON is more JavaScript-Oriented than XML.
3. How to generate JSON?
Since WattDepot is going to provide data in XML format and I am not able to make any change on the server side, I need to find a way to convert XML data to JSON. Actually, there are some existing libraries out there for converting XML to JSON. One of them is Google Data API. In Google.Data.JSON package, it contains a xml_to_json($xml) method that can convert a XML file to JSON format. Here is a reference. In this case, I can simply use Google Data API in my library to handle the conversion.
Hopefully, my blog can help those JSON beginners like me:)
Tuesday, September 28, 2010
WattDepot Data Retrieval Library Design
This week, I started the design phase of WattDepot Data Retrieval Library. In my last blog post, I brought up 5 points that need to be taken care of. This time, I will apply these regulations to my specific project.
1. Focus of the library.
WattDepot Data Retrieval Library is basically designed for retrieving data from a WattDepot Server in a convenient manner. WattDepot is an open source, RESTful web service that collects electricity data from meters and stores it in a database. Here is the Google project hosting page for WattDepot. Right now, users have to manually create the XMLhttpRequests in their page to get the raw data in XML format, which involves a lot of repeating code in generating XMLhttpRequest and data parsing. WattDepot Data Retrieval Library's mission is to simplify this procedure and retrieve data in a user friendly way.
2. Functions should be included in the library.
For the version 1.0, I think I should at least have three types of functions:
a. Function that creates a connection to a WattDepot server. This help your site connect to WattDepot Server and handle the feedback.
b. A series of functions that generates different queries. For example, a function that gets all the source detail in the server would be nice.
c. Function that dynamically parses XML data and translates the content into a different format(JSON).
3. Generality of the library.
This library should work for most common-used browsers. From my previous experience, there is a same origin policy to deal with when retrieving data from a server another domain. Right now, only Firefox has been tested working when using a XMLhttpRequest to retrieve some data. More tests and researches are needed on this subject.
4. Naming convention of the library.
The library object name should be unique(WattDepotData). Variables and functions should follow Java naming conventions. Function with a common name should check for override.
5. Documentation of the library.
The library should have comment before every function. The comment should include the documentation of objective of the function, parameters, return value, and possible exceptions. Global variables should also have in-line comments.
Here is the initial blueprint of the library. The following week, I will start looking at the data structure that WattDepot server provides and organize it into JSON format.
Friday, September 17, 2010
How to build a high quality JavaScript Library
Last week, I was clear on why I should use JavaScript to build the WattDepot data retrieval library. However, before I start coding, I still need to do some research on how to build a high quality JavaScript library. Fortunately, I found a very good presentation about building a JavaScript library given by John Resig who is one of the authors of JQuery. Here I am going to share something I learned from his talk.
1. Always clear on the focus of your library. Every library should have its own specific focus. In another word, a good library should not cover too many things that from different scopes. It should focus on one target.
2. Keep your library as small as possible. The more code you write means the more likely that a bug is there and the more code you need to maintain. Therefore, a good library should not contain any unnecessary function. Any line of the code should be needed for your library.
3. The library should work for any browser. This is a classic problem for a lot of libraries. Since different browsers have different JavaScript support, and their settings keep updating along with different version, it is really hard to build a library that works for every browser. However, a good JavaScript library should work for most common browsers.
4. A good library should not affect or be affected by other person's code. In JavaScript, people can easily extend a object (class). In this case, variable naming method and function override checking are very important for keeping the library code functioning correctly.
5. Handling exceptions and document your code nicely. Usually users don't know the detail of a library, and they just want to use your library to perform certain tasks. In this case, your exception handling is the most easiest way to help users debug their code without looking through the code. If they really need to look at the code, your in-line comment will definitely help them.
All above are some important characters of a good JavaScript library. In the following week, I will find out how these rules applies in my JavaScript library project.
Friday, September 10, 2010
JavaScript vs. Java in web application programing
The past week, I started on my graduate project, which is creating a JavaScript library that facilitates data retrieval in a web application development. In my particular case, my library needs to retrieve all kinds of energy data from a WattDepot Server. Actually, a year ago, my classmates and I worked on a similar project. It was about data retrieval and data representation. The only difference would be that we were using JAVA and Apache Wicket at that time. Then I start asking myself: Why I need to create a new library using JavaScript instead of using the JAVA one we built before? This week, my research focus on finding the value of my graduate project and why use JavaScript instead of Java in web application programing.
Frankly speaking, All I know before is that there are a lot of differences between Java and JavaScript, such as Java needs compile where JavaScript doesn't. I don't really understand why people choose one from the other. After this week's research, I think I got a little idea on why I should create a JavaScript library. Here are some reasons:
1. JavaScript page loads faster then Java ones. When a web page loads a Java applet, it needs to check if a Java Run Time Environment is installed or not. If not, user need to install one in order to load the Java applet successfully. In the other hand, JavaScript is build-in in the browser, which means you don't need anything external to load a JavaScript page. This makes JavaScript more suitable for web application.
2. JavaScript uses DOM(Document Object Model), which is also used in HTML. Thus, JavaScript can easily modify web content, such as creating containers dynamically and so on. However, in Java web application, programmers need to define the containers in advance in an XML file, so that the Java applet can tell the different field.
3. JavaScript is relatively easier when people need to make a change in the application. Since JavaScript is run through a browser, user can easily alter it and see the changes in the next run. Java applets run independent of the page. Programmers need to change the code, then compile the code, then open the page again before seeing any change.
I agree Java is a very mature programming language. It can be used every where and had lots of libraries that handle all kinds of complicated tasks. However, in web application development, JavaScript is easier and more handy for developers. Therefore, it is necessary to have a data retrieval library in JavaScript if it will be used in web application development.
Wednesday, May 5, 2010
Hiding an HTML Element
Most of time people need to change the innerHtml for a container quite often when developing a web page. For example, when you are working on web rich-text editor, and you need to switch the editor from WYSIWYG mode to the source mode. In this case, you might need to hide the preview 'div' and display the edit 'div'. This task is not hard to implement, and also can be implemented in different ways. This blog post will explain several ways to hide the html element.
To make the explaination easier, we need to make some assumptions. Assuming there is a div_A (displaying) and a div_B (not displaying), and if the switch button is clicked, display div_B instead of div_A.
First way is very straight forward: using the style visibility and height attributes. So the code has something like this:
div_B.style.visibility = 'visible';
div_B.style.height = '';
div_A.style.visibility = 'hidden';
div_A.style.height = 0;
div_A.height need to be set to 0, because 'hidden' visibility attribute only hide the element but the space is still there. This method is the way I was using until I found the second way.
Second way is more simple: using the style display attributes. So the code has something like this:
div_A.style.display = 'none';
div_B.style.display = '';
This is much easier, because the display attribute will affect the render list of the page. If it is set to 'none', the page is not going to show this element at all.
Both two methods can hide the html element perfectly, so why not start using the shorter one if you don't know the display attribute before?
Wednesday, April 28, 2010
GeoMap Project Report (Apr 22 - Apr 28)
During this week, I mostly worked on implementing the different mode of GeoMap gadget. Also I spent some time on creating icons and some error handling (e.g. No source is visible on the map). Here is the latest code for GeoMap Gadget.
Here are some screen shots:
Interface when gadget first loaded:

If the mode is consumer or generator:

Summary:
Right now GeoMap gadget will calculate the level thresholds dynamically and change the source icon according the source's latest sensordata. However, it requires a lot of HttpRequest to be sent and processed, which makes the loading kind of slow. I have asked Robert see if he can implement a function that retrieves all sources latest sensor data. If so, I think it will cut the time significantly. For next week, I will work on the subsource link for virtual source and maybe some error handling.
Retrieve data using multiple XMLHttpRequest
Sometimes, one XMLHttpRequest can not retrieve all the required data to perform certain task. For example: I need to display some information of the power plant which generate the most power among 20 power plants. However, the server, which contains those information, only allows me to retrieve the information for one power plant a time. In this case, in order to find the highest power generation power plant, I need to retrieve the information for all 20 power plants first.
Since there are 20 power plants, it is better to use a loop to send XMLHttpRequest. However, once you send an XMLHttpRequest, the code will jump to the callback function to handle the response and it is not going back to the caller. Because of this, the callback function has to be the caller function. So the JavaScript Code may look like this:
In this way, we define a global counter and a global array to perform the loop manually. It can solve the problem for processing multiple XmlHttpRequest, but still it is not the optimal solution. The reason is that retrieving data by creating a big query from the server side is much faster than send the request over and over again.
So the optimal solution is to implement some function in the server side that can get all the requiring data.
Since there are 20 power plants, it is better to use a loop to send XMLHttpRequest. However, once you send an XMLHttpRequest, the code will jump to the callback function to handle the response and it is not going back to the caller. Because of this, the callback function has to be the caller function. So the JavaScript Code may look like this:
var counter = 0; //loop counter
var url = []     //array of url for different source

//Send XmlHttpRequest
function loadXml(url){
  ....
  ....
  ....
}

//Handle the response
function handleResponse(){
  ....
  ....
  counter++;//ready for next source
  requestData();//go back to the caller
}

//loop through all the sources
function requestData(){
  if (counter < url.length) {
    ....//store the data in somewhere
    ....//for example push it into an Array
    loadXml(url[counter]);//send request
  }
  else {
    processData();//handle the data and quit loop
  }
}

//process the data
function processData(){
   ....
   ....
}
In this way, we define a global counter and a global array to perform the loop manually. It can solve the problem for processing multiple XmlHttpRequest, but still it is not the optimal solution. The reason is that retrieving data by creating a big query from the server side is much faster than send the request over and over again.
So the optimal solution is to implement some function in the server side that can get all the requiring data.
Wednesday, April 21, 2010
Project Report (Apr 15 - Apr 21)
During this week, I mostly worked on implementing the source selection page. Also I spent some time on re-factoring the code and doing some research on Google Visualization tabs. Here is the latest code for GeoMap Gadget.
Here are some screen shots:
Interface when gadget first loaded:

Interface for source selection:

Select some source:

After click save:

Summary:
I was trying to use the Google Visualization tab for the source selection page. However, I couldn't load Google Map Object in there. So I didn't use this method. Also, I just noticed that not all the sources are listed in the source selection page. I will take a look at that. For next week, I will work on different modes for GeoMap Gadget.
Callback Function in JavaScript
In JavaScript programing, understanding of callback function is very important. Although I have created several Google Gadget with JavaScript, I am still not very clear with how does callback function work. This week, I was doing some experiment and research on the callback function in JavaScript. Hopefully, my experience can help those who have the same wonder on this topic.
The first callback function example I encountered was a Google gadget example on its documentation page. Here is the code for the callback function part:
In this piece of code, there are several callback functions. So this JavaScript code runs like this:
1. Run _IG_RegisterOnloadHandler function with a parameter that contains the callback function.
2. Run the callback function loadVisualizationAPI if the onload event is triggered.
3. Run the callback function sendQuery if the Google object onload event is triggered.
4. Run the callback function handleQueryResponse if the Google.query object send event is triggered.
Now the question, which confused me a lot, came up. How is this "response" passed to handleQueryResponse function?
Actually, query.send(handleQueryResponse) is only passing a function pointer, which means handleQueryResponse(response) will be called in query.send function hopefully with a variable that declared inside query object. It is only confusing because we cannot see the code for query.send function. Otherwise we probably can see the declaration of the response variable and call the callback function with this variable as parameter.
The key thing to remember here is that the parameter for a callback function is always the pointer to that function. Eventually, the object that triggered the event will call the function with the correct parameter hopefully.
The first callback function example I encountered was a Google gadget example on its documentation page. Here is the code for the callback function part:
    var gadgetHelper = null;
    var table = null;

    _IG_RegisterOnloadHandler(loadVisualizationAPI);

    // Load the Google Visualization API
    function loadVisualizationAPI() {
      google.load('visualization', '1', {'packages': ['table']});
      google.setOnLoadCallback(sendQuery);
    }

    // Send a data query.
    function sendQuery() {
      // Instantiate our Table visualization.
      var tableDiv = _gel('tablediv'); // A gadget convenience method for getElementById
      tableDiv.style.width = document.body.clientWidth + 'px';
      tableDiv.style.height = document.body.clientHeight + 'px';
      table = new google.visualization.Table(tableDiv);

      // The query src URL is stored in the user prefs.
      // This GadgetHelper convenience method loads it into a
      // query for you.
      gadgetHelper = new google.visualization.GadgetHelper();
      var query = gadgetHelper.createQueryFromPrefs(prefs);
      query.send(handleQueryResponse);
    }

    // Get a query response.
    function handleQueryResponse(response) {
      // Use the visualization GadgetHelper class to validate the data, and
      // for error handling.
      if (!gadgetHelper.validateResponse(response)) {
        // Default error handling was done, just leave.
        return;
      };
      var data = response.getDataTable();

      table.draw(data, options);
    };
In this piece of code, there are several callback functions. So this JavaScript code runs like this:
1. Run _IG_RegisterOnloadHandler function with a parameter that contains the callback function.
2. Run the callback function loadVisualizationAPI if the onload event is triggered.
3. Run the callback function sendQuery if the Google object onload event is triggered.
4. Run the callback function handleQueryResponse if the Google.query object send event is triggered.
Now the question, which confused me a lot, came up. How is this "response" passed to handleQueryResponse function?
Actually, query.send(handleQueryResponse) is only passing a function pointer, which means handleQueryResponse(response) will be called in query.send function hopefully with a variable that declared inside query object. It is only confusing because we cannot see the code for query.send function. Otherwise we probably can see the declaration of the response variable and call the callback function with this variable as parameter.
The key thing to remember here is that the parameter for a callback function is always the pointer to that function. Eventually, the object that triggered the event will call the function with the correct parameter hopefully.
Wednesday, April 14, 2010
Overcome Same Origin Policy with XMLhttprequest
Same Origin Policy is a browser policy that forbids JavaScript from getting files from another domain. I have never noticed this before because I never tried to get something from another server. However, during the development of my Google Gadget Project, I first encountered the troublesome that brought by Same Origin Policy. I did some research on the web and here is my experience on how to overcome this problem.
First let me describe the problem I need to solve. I need to access some XML file from a known server by using AJAX.
Here are some solution I found from the internet:
1. Set a Proxy on your site
I didn't try it, because I am not familiar with it. However, the concept is easy to understand. The only drawback is that it takes longer time to get the response because the request is not directly sent to the target.
2. Use < script >
I did play with this method. The concept is very straight forward too. < script > has an attribute "src" which allows you to include something from another domain. The most important point is that it is not restricted by the same origin policy. So I created a function that create a "script" object dynamically, and put the URL in the "src" attribute. After I invoke the function, there is a new script object in the header, and it actually contains the content from that external URL! However, this is not working for retrieving XML files, because I cannot actually access the data. But this way works perfectly if the external data is a JavaScript file, since you just need to call some function or get the value of some variable.
3. Modify the server response header
This is the way that I used to overcome the Same Origin Policy. W3C organization is proposing a way to enable Cross-Origin Resource Sharing. One of the feature is that user can specify the trusted domains in the Access-Control-Allowed-Origin in the response header. In this way, those trusted domains can use the regular XMLhttpRequest to perform some http method (GET&POST). Since this modification has to be made on the server side, it means you must be able to modify the server response header or at least know some one can do that for you. Here is a pretty detail example on this topic.
Finally, I contact the Server Manager for the WattDepot Server and all the same-origin-policy problems are gone. If you are not able to modify the response header in the server side, here is a very useful blog post of using other ways to overcome the same origin policy. (It has some Chinese character, but there is English explanation too).
Wednesday, April 7, 2010
How to find the coordinate of a place
This week, I was assigned to an interesting task that searches for the longitude and latitude of some power plants in Oahu. Well, it looks very easy, but actually it is quite tricky. When I was trying to find something, the first thing come to my mind is to Google it. I went through these power plants' home page, but it is not easy to find the exact coordinate of the power plants (Because most of them only have an address for the power plant).
Then, I used Google Map to search the address that I just acquired. However, the longitude and latitude information was still not showing. At this point, I just played around with all the possible tools in the Google Map. Finally, I found a way to get a loose coordinate of a place.
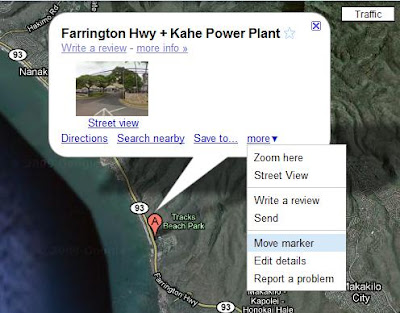
First you need to click on the marker and choose "Move marker" from the "more" drop down list.
Then you may drag the marker to the place that you want to know the coordinate. And then right click on the marker and choose "What's here?".
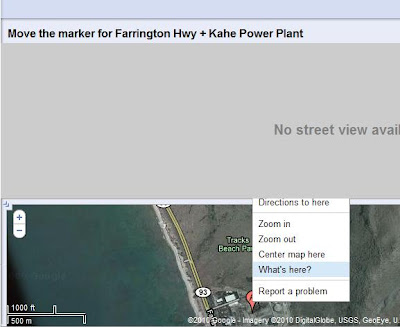
Then you may notice that the coordinate is displayed in the search box now.

Although it takes some steps to get the coordinate, this is the easiest way I found so far. To make searching coordinate little bit easier, I created a Google Gadget that provides a drag-able marker that shows the coordinate of the marker. However, you need to know a loose coordinate of the place first. Anyway, here is the link for the location finder gadget.
Then, I used Google Map to search the address that I just acquired. However, the longitude and latitude information was still not showing. At this point, I just played around with all the possible tools in the Google Map. Finally, I found a way to get a loose coordinate of a place.
First you need to click on the marker and choose "Move marker" from the "more" drop down list.

Then you may drag the marker to the place that you want to know the coordinate. And then right click on the marker and choose "What's here?".

Then you may notice that the coordinate is displayed in the search box now.

Although it takes some steps to get the coordinate, this is the easiest way I found so far. To make searching coordinate little bit easier, I created a Google Gadget that provides a drag-able marker that shows the coordinate of the marker. However, you need to know a loose coordinate of the place first. Anyway, here is the link for the location finder gadget.
Wednesday, March 31, 2010
Geting start with Google Map API
Recently, I am working on a project called WattDepot GeoMap. This project is a Google gadget that displays the sensor data from WattDepot Server on a Google Map. Since I had no experience of using Google Map API, I decide to do some research on its documentation page. The documentation for Google Map API is very detail, and it provides lots of sample code that help users to understand.
Among all these examples, I think the custom icon example is the most helpful for a beginner. It contains a lot of functions, such as:
- load Google Map API
- create a Map object
- set the map center
- create an icon object
- create markers object
- load marker options
- add some events for the marker
- display markers
These functions are very basic. However, it is good enough to build some nice Google Map gadget with these functions already. Here is a screen shot for the GeoMap 1.0 I made.

Wednesday, March 17, 2010
Protential Visualization for Milestone 3
After the second milestone, we closed down some finished projects (Stoplight gadget, Kukui Cup design) and start up with some new projects (CSS design, Innovation visualization). This time, I was in the Innovation visualization group. Paul and Jarret are still my teammates, and we have Kendyll and Edward joining in.
Our first task for milestone 3 is to think of a potential useful visualization that can be used in Kukui Cup. Professor Johnson provided us a list of possible visualizations, such as:
(1) Annotated timeline.
(2) Bio Heat Map.
(3) Drastic TreeMap
(4) Dygraphs
(5) Gauge
(6) Geomap/Intensity Map
(7) Motion chart.
(8) TermCloud
Among those visualizations, I think Geomap/Intensity Map is very cool. It is also very challenging too. I couldn't think of a way to program a image to update part of it dynamically without re-loading the whole image. Another visualization I am interested in is Bio Heat Map. It can provide lots of information such as the trend of energy usage in a specific time interval. Motion chart is very amazing too. However, right now I don't have any experience in the motion chart API yet.
Anyway those are the top three visualizations I would pick. Hopefully after next meeting, I will actually work on one of them.
Tuesday, March 9, 2010
Done with WattDepot Monitor Gadget
Finally, our second milestone is approaching. However, I have to flight to the main land this Thursday and come back next Monday, which means I cannot accomplish too much during this period. Luckily, we do not have too much work left since last week and it turned out that my teammate did a great job this week. We released the WattDepot Monitor Gadget 1.2 as our final version. Here is the project hosting.
Basically, we have to work on two main things this week:
First, figure out a way to refresh the query instead of reload the entire page. In the beginning, we thought we might need to use AJAX. But Jarret found out that we only need to change a small thing to reach our goal. He uses setTimeOut method which is our current way to do the refresh, however, instead of pushing the windows reload function, he pushed the sendQuery function. The sendQuery function is the main function that talk to the server and retrieve data. In this way, we can refresh the gadget without loading the whole gadget. So we apply this feature for both Stoplight gadget and WattDepot Monitor Gadget. Both of them are much faster in updating now.
Second task is error handling. For our previous version of WattDepot Monitor Gadget, we didn't implement any error handling. This week, Paul implement some basic error handling for WattDepot Monitor Gadget. He checked the user inputs of host URL and Source Name to make sure both fields are not blank. Error handling about the google query can be implemented later.
What I did this week mostly are some utilities. For example I created a help page for our WattDepot Monitor Gadget. Also I fixed some existing bugs in the WattDepot Monitor, such as incorrect column name in the google query.
Anyhow, this is a screen shot for our WattDepot Monitor Gadget 1.2:

For next milestone, our class is going to regroup the student. I have no idea which project I am going to work on, but I had a good time with stoplight group. I made some friends and both Jarret and Paul are very talented people. Hopefully, we can work together later on.
Tuesday, March 2, 2010
Javascript & Date
For this week, our team worked on both Stoplight Gadget and WattDepot Gadget Monitor again. Although we committed our Stoplight 1.5 as our final version, it seems that there is always new requirement. Professor Johnson asked us to use another way to represent the message data. So we decide to let Jarret work on this task. He ran into some small problems, but he finally conquered them and release the new Stoplight Gadget 1.6. Hopefully, it brings an end to this project for now.
On the other hand, I worked on WattDepot Gadget Monitor. This week, we are ready to connect the WattDepot Gadget Monitor to the WattDepot Server (We were using Google Spreadsheet before). I basically follow the WattDepot documentation and modify the data source URL according to the user input. Another thing came up this week is formatting date object in JavaScript. In Google data table, date is formatted as MMM dd, yyyy hh:mm:ss. However, the JavaScript built-in date object does not have a method to convert the month to some string like "Jan" or "Feb". Therefore, I have to make a simple function to convert month number to relative text. Since JavaScript is a very popular language now days, I would say it will be much easier for user if the developers can provide more date conversions.
I am still having difficulties in generating the drop down menu dynamically. I have post my question in the Google Gadget discussion group, but no one replied yet. So we make the source input as a text box instead of a hard-coded drop down menu. Hopefully, some one can response my post and I can generate the source drop down menu dynamically.
Monday, February 22, 2010
What's Next
Since we finished development on our first Google Gadget Project last week, we are ready for some new project. So during the meeting with Dr. Johnson, he introduced our next project (WattDepot Gadget Monitor) to us. Also during the meeting, we found there were still some minor things need to be taken care of. Therefore, the task for this week is to clean up the rest of Stoplight Gadget and also start the development on new project.
For the clean up, we added a new user field called title, which allows user to specify what this gadget for. Since we couldn't get the scalable image working, we created a drop down menu to let user pick the size of the image.
My task is to create the first version of WattDepot Gadget Monitor. WattDepot Gadget Monitor is a google gadget that retrives a value from WattDepot Server and display it. It allows user to choose a source from all sources in WattDepot Server, as well as data displayed in the gadget (either Energy or Carbon). Because I had some experiences in gadget development from last project, this time the version 1 development went pretty smoothly. The only problem I had so far is that I am not sure how to generate the drop down menu dynamically. Hopefully, in the following week I can find a solution to it.
Tuesday, February 16, 2010
This is it... the Stoplight Gadget
Finally, our last version of stoplight gadget,Stoplight Gadget 1.4, is released. From now on, we are going to pause our development on Stoplight Gadget. We have added it to the Google Gadget gallery so that other people may use it or improve it.
In this week, we made several enhancement. First of all, we added a new user input field called 'Unit', which let user specify the unit of the data from the data source. In addition, we modified the auto-refresh system so that the message get refreshed as well. Further more, we added some error checking in the gadget. We also tried to make our stoplight image scalable, but we didn't successfully implement it.
My task this week was fixing the auto-refresh system. This bug was discovered last week in the meeting with Dr. Johnson. In Stoplight Gadget 1.3, the message area is not auto-refreshed. This function is implemented by using a default method in Google.Visualization.Query class called setRefreshInterval. This method will send the query every certain time period. However, I found that the query will only be sent if the data in the data source is changed. Since the message source did not change when we changed the data source, the query for helpful message was not sent. That's why the message area is not auto-refreshed. In this version, I used the most common JavaScript method: system.timeout method. This will refresh the page for every certain time period. It works a little bit slower than the Google Query method, but acceptable.
Second thing I worked on this week is to determine the "direction", which tells whether the lower number is preferable or the larger number is preferable. In the current version, the gadget will compare the two values that user set for green threshold and red threshold. If the green threshold is smaller, then lower number will be preferable. If the green threshold is larger, then larger number will be preferable.
Basically, this is it, our first Google Gadget. I would say I earned a lot of experience in Google Gadget development. The most enjoyable thing for me is the joy of solving the problems that I run into during the development. The next week, we are going to work on something else. Hopefully, it will be a fun project.
Monday, February 8, 2010
Playing with Google Visualization Query
Since a month has passed, this week is the last week before our first milestone. During this week, we re-organized the SVN repository. Also we updated our Google Project Hosting page. Further more, we improved our existing stoplight gadget a little bit and release the version 1.3.
Among these tasks, I worked on improving the stoplight gadget. For the new version of stoplight gadget, users can specify if they want auto-refresh in their gadget. To implement this functionality, I just create a new user input and pass the value to the Google Visualization Query default method setRefreshInterval. The second enhancement is that user can specify a message source URL in the gadget. This message source URL should contain the relevant message about the data from the data source URL. Hopefully, this message can help user better understand the stoplight and the data. This functionality requires to send another Google Query in the gadget. To figure this out, I had a lot of fun in studying the Google Visualization Query.
Initially, I was trying to nest the Google Query together, which looks like:
However, I found that handleQB is never invoked. Then I start Googling this problem. Most post said it is because the request ID for two query.send are the same, so the query.response will confuse which request should response to. However, it is not a really good idea to manually set the request ID, since handling the response requires modifying the server side which is kind of pain in the ass. After couple days thinking, I just realized this actually is not very hard. I simply moved the code a little bit. So the code looks like:
Yes, it is very simple. So it seems Google Visualization Query does not like get nested. Anyway, I am very surprised that some tasks look so hard, but we soon can figure out how easy they are if we take another perspective.
Well, here is a link for the Stoplight Gadget 1.3. I am looking forward to the upcoming enhancement of this project.
Among these tasks, I worked on improving the stoplight gadget. For the new version of stoplight gadget, users can specify if they want auto-refresh in their gadget. To implement this functionality, I just create a new user input and pass the value to the Google Visualization Query default method setRefreshInterval. The second enhancement is that user can specify a message source URL in the gadget. This message source URL should contain the relevant message about the data from the data source URL. Hopefully, this message can help user better understand the stoplight and the data. This functionality requires to send another Google Query in the gadget. To figure this out, I had a lot of fun in studying the Google Visualization Query.
Initially, I was trying to nest the Google Query together, which looks like:
MainMethod{
  ...
  ...
  queryA.send(handleQA)
}

handleQA(response){
  ...
  ...
  queryB.send(handleQB)
}

handleQB(response){
  ...
  ...
}
However, I found that handleQB is never invoked. Then I start Googling this problem. Most post said it is because the request ID for two query.send are the same, so the query.response will confuse which request should response to. However, it is not a really good idea to manually set the request ID, since handling the response requires modifying the server side which is kind of pain in the ass. After couple days thinking, I just realized this actually is not very hard. I simply moved the code a little bit. So the code looks like:
MainMethod{
  ...
  ...
  queryA.send(handleQA)
  queryB.send(handleQB)
}

handleQA(response){
  ...
  ...
}

handleQB(response){
  ...
  ...
}
Yes, it is very simple. So it seems Google Visualization Query does not like get nested. Anyway, I am very surprised that some tasks look so hard, but we soon can figure out how easy they are if we take another perspective.
Well, here is a link for the Stoplight Gadget 1.3. I am looking forward to the upcoming enhancement of this project.
Monday, February 1, 2010
Stoplight Gadget 1.2
This week, we keep working on the Stoplight Gadget project. This time, we made some remarkable progress and release the version 1.2(http://stoplightgadget.googlecode.com/svn/tags/Gadget_1_2/stoplight_gadget.xml). Version 1.2 basically has four enhancement.
First of all, I add three user inputs (Data source URL, threshold for green light, and threshold for red light) in the Stoplight Gadget, and the gadget is able to read and use the inputs. All of these input fields are created by "user pref". Google has a pretty detail documentation of it. However, I am still not sure how to create Google Visualization Query from the user pref.
Second, I modified the Google Visualization code, so that it displays a stoplight image instead of the actual data. This time, we simply add a few "if" statements in the JavaScript for the value comparison. Also we use a image tag to display the stoplight image.
Third, Jarret embedded the our Stoplight Gadget to our Google Project Hosting website. Also he fixed my Visualization Code so that adjust the image size.
One more thing, Paul figured out a way to use the URL in Google Project Hosting in the Gadget. He found two ways: either use the raw file URL in Google Project Hosting or set the MIME type property of the Visualization JavaScript and modify the SVN configuration.
So basically this is what we had so far. The lesson I learned from Google Gadget development so far is that debug in Google Gadget is not very easy. Google Gadget Editor is the tool that I mostly use in coding. However, it does not provide a preview if the gadget requires a user input. So I have to add it to the iGoogle all the time. Also it seems the page caches the gadget code. Sometimes I made some changes and click save, but the changes are gone when I load the file again. Anyway, I think the IDE is really a serious issue for Google Gadget Development.
Wednesday, January 27, 2010
Get Started With Gadget and Visualization
This week, we had our first team meeting with Dr. Johnson. It turned out that we actually misunderstood the project requirement. In the beginning, we thought this Stoplight project is same as the Stoplight we designed last semester. The only thing we need to do is to make a Google Gadget and visualization for it. However, we actually need to create a generic Stoplight that takes any data source. Since we are still new comers in Google Gadget, we decide to develop the project into three steps.
The first step:
Implement a Google Visualization that displays a number. Create a Google Gadget that retrieves a number from a Google Spreadsheet.
The second step:
Modify the Google Visualization that displays a stoplight according to the number that pass to it. Modify the Google Gadget that takes three user inputs: Data source URL, Red threshold, Green threshold.
The third step:
Modify the Google Visualization that displays a stoplight and a text message and handles error. Modify the Google Gadget that refreshes after a certain time period.
This week, I finished implementing the first step. Basically, I just follow the example in Google Documentations. It has tutorial for how to get Google Spreadsheet URL, how to create a Google Visualization Query, how to include visualization in the Google Gadget. Finally, this is my first try on Google Visualization and Google Gadget (http://stoplightgadget.googlecode.com/svn/tags/Gadget_1_1/Gadget_1_1.xml).
For the next week, I am going to dig more in Google Visualization so that it can display a image. Also I will find out what else data format can be convert into Google datatable and how to make the user input in Google Gadget. Hopefully, we can make a better looking Gadget next week.
Tuesday, January 19, 2010
Back to the Software Engineering
After a short winter break, I am back to software engineering. I am very glad to take Dr.Johnson's class again, which is also part of my graduate research. This class is sort of an extension of the project (WattDepot Web Application) that I worked on last semester.
This semester we are going to create a dorm competition for energy usage called Kukui Cup. It contains a lot of parts. I was in the team of creating a Google Gadget for the stoplight that we built last semester. Further more, we also need to integrate Google Visualization to this stoplight gadget.
Stoplight team has three members: Jerry, Paul and I. We had our first meeting on Monday. We talked about the project schedule and came up with some questions that we are not sure. Both Jerry and Paul are very friendly and energetic. I hope we can have fun in this project and develop a remarkable Google Gadget.
For this week, I am going to walk through the Google Gadget Tutorial ( I have looked at it a little bit. It is very detail and helpful.) Interestingly, I figured that Google Chrome has a problem in parsing the xml version of a Google Gadget. And everything looks good in FireFox. The second task for us is to get familiar with JavaScript and Google Visualization API, so that we can get ready for the future development.
Subscribe to:
Posts (Atom)